Anyone who sends an email wants to keep their messages out of the recipient’s spam or junk folders. You also want to avoid bounced messages with “SPF record failure” errors, and failure errors for messages you never sent. Email authentication is the way to solve all of those problems.
What Are SPF and DKIM?
The two major tools in email deliverability are SPF (Sender Policy Framework) and DKIM (DomainKeys Identified Mail) records.
- An SPF record contains information about which IP addresses are authorized to send mail from your domain. So when you send a message, the receiving server compares the IP address information in the message with the IP address information in your publicly available SPF record. If they are a match, the email is delivered.
- When a DKIM record is added to the DNS zone for a domain, a code is added to the DNS zone and the headers of outgoing messages. The receiving servers compare the code in the headers with the information in the DNS zone. If they are a match, the email is delivered.
The methods are similar, with the receiving server checking DNS records to authenticate messages, but SPF uses path-based authentication (your server’s IP address) while DKIM uses identity-based authentication (the unique code in your message headers).
If it sounds complicated, the good news is the records can be created and published automatically for your GreenGeeks hosted email accounts. The cPanel “Email Deliverability” section is where DKIM and SPF records are created or managed, and where the status of PTR (Reverse DNS) records is displayed.
How to Authenticate All of Your Email in a Few Easy Steps
Method 1: Using the Account Manager
Log in to GreenGeeks and from the main dashboard page, click on the “Manage” button.

On the page that opens up, select the “Email” tab option and in the dropdown menu select “Email Deliverability.”

On this page, you will see all domains you have listed. You can also see that under the “Email Deliverability Status” that all the records are valid and correct.

You can see Click the ‘Manage” button next to whatever one you want to view the DKIM and SPF records.

The “Suggested ‘SPF’ (TXT) Record” and “Suggested ‘DKIM’ (TXT) Record” fields will be pre-populated with the system’s recommendations (if there are no existing records, the recommendations can’t be edited, they can only be accepted).
Method 2: Using cPanel
To access the email deliverability tools, log in to GreenGeeks and go to cPanel by clicking the “cPanel Login” button in the “Quick Server Login” section.

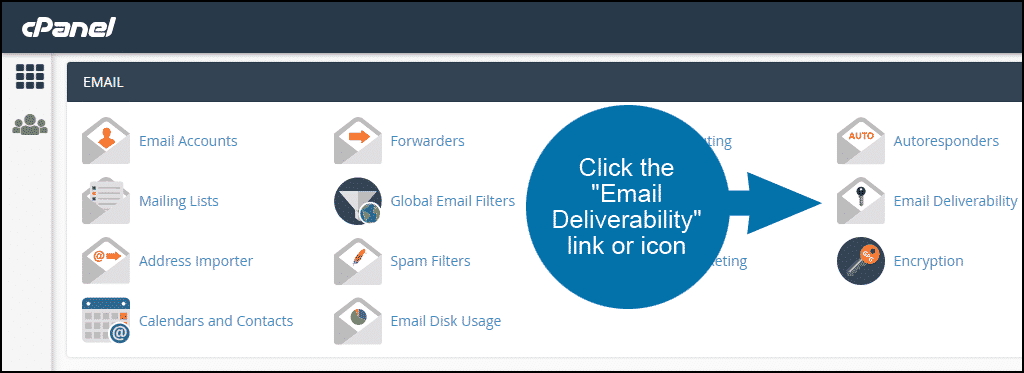
In the “EMAIL” section, click the “Email Deliverability” link or icon.
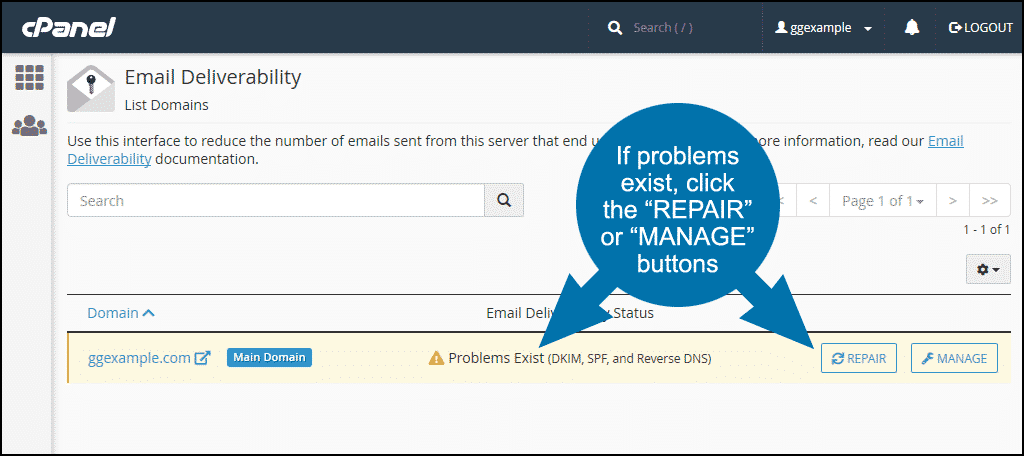
If the “Problems Exist” warning is shown, click the “REPAIR” or “MANAGE” buttons. “REPAIR” takes you through the settings step by step, “MANAGE” is all of the controls on one page, used for manual configuration or copying values to your DNZ zone file.
For the purposes of this tutorial, we will use the “REPAIR” button.
Note that the “REPAIR” button will not be available if your DNS does not point to the GreenGeeks server.
If you’ve never set up any email authentication, the first thing you will see after clicking the “REPAIR” button is “A DKIM key for ‘ggexample.com’ does not exist on the local server.”
Click the “GENERATE LOCAL DKIM KEY” button.
The “Suggested ‘SPF’ (TXT) Record” and “Suggested ‘DKIM’ (TXT) Record” fields will be pre-populated with the system’s recommendations (if there are no existing records, the recommendations can’t be edited, they can only be accepted).
Click the “REPAIR” button to add the records to the DNS zone of the domain.
When you go back to the main Email Deliverability page, you should see a “Valid” status (it may take a minute or two for the records to be checked).
For further information, take a look at the cPanel Email Deliverability documentation.
The post Using the Email Deliverability Tools for GreenGeeks appeared first on GreenGeeks Support.


